
CSS 2 Selector Fundamentals
I originally wrote this article sometime back in 2003 for a site called the Nemesis Project that has since fallen off the Net. Because it still (shockingly) has some useful fundamental information I decided to republish it here just so it would have a home somewhere. I’ve done little more than reformat it slightly. If any information is out of date or if any links are broken feel free to leave a comment.
In this article, the first in a two-part series, we’re going to
take a look at the basics of selectors in Cascading Style Sheets, Level
2 (CSS 2), including the components used to build them and the various
ways to combine them. It’s important to understand that what
I’m presenting here is the full view of selectors as defined in
the CSS 2 Specification. You may or may not be able to put some of the
concepts discussed to use today because of poor browser support,
particularly in the areas of attribute selectors and the
:before and :after pseudo-elements. However,
seeing the bigger picture provides valuable context, and support is
continuing to grow. You don’t want to be caught looking backwards as
things move forward. So let’s start out by examining some
fundamental questions about CSS selectors.
What is a selector?
Selectors are one half of CSS’s bread-and-butter component: the rule set. When a browser applies a rule set from a style sheet to a document, the selector tells the browser which elements in that document the rule set should act on. Its counterpart, the declaration block, contains the instructions that are to be carried out. Let’s take a look at a simple example:
h1 { font-style: italic; }
The selector in this rule set is h1, and the declaration
block contains a single declaration (font-style: italic;), itself composed of a property
(font-style) and a value (italic). Together
they tell the browser to display any first-level headers in the
document in italics.
How do selectors work?
In order to really understand how selectors do what they do we need to take a slight side trip into how browsers actually deal with markup. When a browser interprets a document marked up with a language such as HTML, XHTML, or XML, it parses the data that document contains into a tree structure called, appropriately enough, the document tree, where the branches of the tree are created by the relationships between the different elements in the document—which elements contain which other elements. This is actually easier to explain visually, so let’s examine a markup snippet:
<div>
    <p>This is a <em>paragraph</em></p>

    <ul>
        <li>Item One</li>
        <li>Item Two</li>
        <li>Item Three</li>
    </ul>
</div>
That markup would be turned into a tree structure essentially like this:
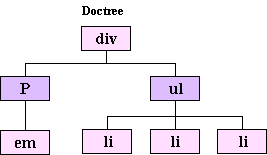
As you can see, the div contains two other elements: a paragraph, which itself contains an emphasis element, and an unordered list that contains three list item elements.
A great way to think about the document tree is to imagine it as a family tree, a concept that you’re probably more familiar with. The document tree even uses the same terminology. If an element contains another element, that first element is said to be the parent and the second the child. Likewise, if two elements have the same parent they are said to be siblings. Elements can have descendants farther down in the tree and ancestors higher up.
You’ve probably heard the phrase, “separation of style and structure,” tossed about a great deal. Well, the document tree and all its relationships are the “structure” part of that concept, and the declarations in the style sheet are the “style.” Selectors are the link that allows you to connect the two while keeping them separate.
Selectors are essentially just patterns. The browser takes those
patterns and looks for elements in the document tree that match them.
They can be very simple patterns, like h1 or
p, or they can be somewhat more complex requiring specific
relationships between multiple elements in order to match. For example:
div#main > h3.product + p:first-line
Incidentally, if you are already able to decipher that you probably don’t need to be reading this article. If not, don’t worry about it; you should be able to figure it out by the time we’re through.
Now that we’ve gotten the basic theory out of the way, we’re ready to examine the components used to build selectors. There are two basic categories of selectors: simple selectors and compound or contextual selectors, which are made up of simple selectors joined by operators called combinators.
Simple Selectors
Simple selectors are patterns that only examine single elements in the document tree at a time. The recipe for building simple selectors is, strangely enough, rather simple:
- Start with one of:
- Universal selector
- Type selector
- Add any number of:
- Attribute (or class) selectors
- ID selectors
- Pseudo-class selectors
- Optionally, add one:
- Pseudo-element selector
Of course, that recipe isn’t terribly helpful if you don’t know what the various ingredients are, so let’s go over those next.
Universal Selector
The universal selector is the most generic of all the selectors. It is
represented by an asterisk (*) and matches any element in the document
tree. If there are any other components in the simple selector you can
leave off the asterisk. For example, these rule sets would match
exactly the same elements:
*.footnote { font-size: smaller; }
.footnote { font-size: smaller; }
Type Selectors
A type selector can be the name of any element from the particular markup language your document uses, and matches every instance of that element in the document tree. This rule set would match every list item in the document:
li { color: blue; }
Attribute Selectors
Attribute selectors allow you to select elements based on the presence
or value of their attributes. They are written using a comparison
statement enclosed in square brackets ([]). CSS 2 provides four
different comparisons for attribute selectors:
[attribute]Match elements that have attribute set at all.
[attribute="value"]Match elements where attribute’s value is exactly “value”.
[attribute~="value"]Match elements where attribute’s value is a space-separated list containing “value”.
[attribute|="value"]Match elements where attribute’s value is a hyphen-separated list starting with “value”. This is used predominantly (if not almost exclusively) with the lang attribute, which is a hyphen separated list of language codes. E.g., the selector
[lang|="en"]would match both of these paragraphs, while the selector[lang|="en-US"]would match only the second:<p lang="en-UK">He looked down and realised that he was wearing two different colour socks and his pyjama shirt.</p> <p lang="en-US">He looked down and realized that he was wearing two different color socks and his pajama shirt.</p>
So, for example, if you wanted to style all links in a document, but
not the named anchors, you might write a selector that would match any
a element with an href attribute:
a[href] { font-weight: bold; }
Or, if you wanted to style the label of a particular form field, you
might write a selector that would match the label element with the ID
of the field as its for attribute value:
label[for="namefield"] { font-weight: bold; }
Class Selectors
Class selectors are represented by a period followed by the class name you want to match. This rule set would match any element with a class attribute containing the term “byline”
.byline { font-style: italic; }
For example, that rule set would match both of these elements:
<div class="byline"> ... </div>
<div class="feature byline external"> ... </div>
Class selectors are nothing more than an attribute selector shortcut for authors styling HTML documents. That is, these two selectors mean the exact same thing when applied to an HTML document:
.byline
[class~="byline"]
ID Selectors
You’d probably never guess from their name, but ID selectors allow you to
select unique elements from the document tree using the value of their
id attributes. They are made by adding a hash or pound sign (#) to the
beginning of the ID you wish to select:
#footnotes
ID selectors are somewhat similar to class selectors in that they, too, can be represented as attribute selectors that will select the exact same elements from the document tree. This attribute selector, for example, will find the same elements as the previous ID selector:
[id="footnotes"]
However, there is one very important difference: CSS grants ID
selectors a higher level of specificity than attribute selectors. I
will explain this in much more detail in my next article, but in a
nutshell that means that if you specified both of the rule sets below
in the style sheet(s) for a document, the font-style declaration from
the rule set with the ID selector would always override the one from
the attribute selector rule set.
#footnotes { font-style: normal; }
[id="footnotes"] { font-style: italic; }
This would be true regardless of the order they were specified in, and the text in the element with the ID “footnotes” would appear in normal text instead of italics.
Pseudo-class Selectors
CSS 2 provides seven different pseudo-class selectors. They work by matching certain characteristics of elements in the document tree that aren’t explicitly encoded in their names or attribute values. The seven pseudo-classes are as follows:
:linkMatch links in the document that are unvisited.
:visitedMatch links in the document that have been visited.
:hoverMatch an element pointed to but not activated by the user (e.g., mousing over a link).
:activeMatch an element being activated by the user (e.g., clicking on a button).
:focusMatch the element that has the browser&rsquol;s focus (e.g., a form field that’s accepting input).
:first-childMatch an element if it is the first child of its parent. For example, the selector
p:first-childwould match every paragraph in a document that was the first child of its parent. People sometimes incorrectly interpret this to mean the first paragraph in the parent element. To illustrate, the previous selector would match the first paragraph below, but not the second:<div> <p>This is a paragraph.</p> </div> <div> <h1>This is a heading</h1> <p>This is another paragraph.</p> </div>:lang()Match elements based on the language that the document or portion of the document is specified to be in. The desired language code is given as an argument to the selector, for example,
:lang(en)would match elements in English,:lang(de)in German, etc.
Pseudo-element Selectors
In much the same way that pseudo-class selectors allow you to select groupings of elements based on characteristics beyond those encoded in the document, pseudo-element selectors allow you to select elements that aren’t explicitly defined in the document tree. There are four such pseudo-elements defined by CSS 2:
:first-letterMatch the first letter of an element.
:first-lineMatch the first line of content in an element (as rendered, not as in the source).
:beforeUsed to insert generated content before the matched element’s actual content.
:afterUsed to insert generated content after the matched element’s actual content.
The :first-letter and :first-line pseudo-elements
are pretty self-explanatory, but :before and :after
might seem a little odd. It might help to think of them as creating
pointers in the document, similar to the way clicking the mouse in a
line of text in a word processor moves the cursor there so you can
insert text. Here’s a simple example of :before and
:after pseudo-elements at work:
p:before { content: "["; font-weight: bold; }
p:after { content: "]"; font-weight: bold; }`
Applying those rule sets to markup like this:
<p>This is a paragraph.</p>
<p>This is another paragraph.</p>
Might yield something like this when rendered:
[This is a paragraph.]

[This is another paragraph.]
One thing to note about pseudo-element selectors that will be important when we move on to contextual selectors: only one pseudo-element selector is allowed in a contextual selector, and it must be at the end of the last simple selector in the chain.
Putting it all Together
Now you’ve seen all the available components for building simple selectors in CSS 2. Combining them is just a matter of concatenating the different components you need with no spaces in between. Let’s work through a couple of examples to see how we can make use of all this.
Let’s say we wanted to style the first line of any paragraph with
a class of “excerpt” when it’s the first child of its
parent. Examining that, we can see that we’re going to need a type
selector (p), a class selector (.excerpt), a
pseudo-class selector (:first-child), and a pseudo-element
selector (:first-line). All that’s left now is putting
them together according to the instructions in the simple selector
recipe:
p.excerpt:first-child:first-line
We know the type selector has to be first and the pseudo-element must be last, but the class and pseudo-class selectors may appear in any order. So, it would be just as correct to have written it this way instead:
p:first-child.excerpt:first-line
Now let’s try another. How about a selector to match any element
that has a title attribute while the user is hovering over it? Again,
breaking it down we’re going to need a universal selector to
select any element (*), an attribute selector
([title]), and a pseudo-class selector (:hover).
Slap ‘em together and what do you get?
*[title]:hover
Again, the attribute and pseudo-class selectors could be specified in whatever order you like. Also, since the universal selector is not the only component in use we could omit the asterisk:
[title]:hover
Simple selectors can only get you so far, however. Before long you will find you want to be able to match patterns of multiple elements, and this is where contextual selectors come in.
Contextual Selectors
A contextual selector is one that selects an element based on its context (No duh, huh?), that is, its relationship with other elements in the document tree. As I explained earlier, the way you build a contextual selector is by joining multiple simple selectors with operators called combinators. CSS 2 provides three different combinators: decendant, child, and adjacent sibling.
Descendant Combinator
The decendant combinator is simply any whitespace, such as some number of space characters, and indicates that you want to select elements that match the second simple selector when they are contained inside of an element that matches the first simple selector. It doesn’t matter how deeply the second element is nested inside the first—it could be a direct child or a great-great-great-great-grandchild of the first element.
Here is a couple of examples and what they mean:
div.sidebar pSelect any paragraph that is a descendant of a div with a class of “sidebar”.
This selector would match both paragraphs in this markup:
<div class="sidebar">
    <p>This is a paragraph</p>
    <div>
        <p>This is another paragraph.</p>
    </div>
</div>
#maincontent blockquote p:first-child:first-lineSelect the first line of any paragraph that is the first child of its parent and is a descendant of a block quote, which itself is the descendant of any element with the ID “maincontent”.
This selector would match the first lines of both paragraphs in this markup:
<div id="maincontent">
    <blockquote>
        <p>This is a paragraph.</p>
        <div>
            <p>This is another paragraph.</p>
        </div>
    </blockquote>
</div>
Child Combinator
The child combinator is the greater-than symbol or right angle bracket
(>). Using it to combine two simple selectors means that
elements matching the second simple selector should be selected when they
are immediate children of an element matching the first.
Let’s take a look at some examples using the child combinator:
div.sidebar > pSelect any paragraph that is an immediate child of a div with a class of “sidebar”.
This selector would match only the first paragraph in this markup:
<div class="sidebar">
    <p>This is a paragraph</p>
    <div>
        <p>This is another paragraph.</p>
    </div>
</div>
#maincontent blockquote > p:first-child:first-lineSelect the first line of any paragraph that is the first child of a block quote, which itself is the descendant of any element with the ID “maincontent”.
This selector would match the first line of the first paragraph in this markup:
<div id="maincontent">
    <blockquote>
        <p>This is a paragraph.</p>
        <div>
            <p>This is another paragraph.</p>
        </div>
    </blockquote>
</div>
Adjacent Sibling Combinator
The last combinator is the adjacent sibling combinator. It’s represented by the plus character (+) and when used to combine two simple selectors it selects elements that match the second simple selector and are immediately preceded by an element that matches the first simple selector and has the same parent as the second.
Here’s an example:
div.sidebar p + pSelect any paragraph that is immediately preceded by a sibling paragraph that is a descendant of a div with a class of “sidebar”.
This selector would match only the second paragraph in this markup:
<div class="sidebar">
    <p>This is a paragraph</p>
    <p>This is another paragraph.</p>
</div>
Grouping Selectors
Frequently you will find that you want to apply the same rules to elements matched by different selectors. In order to keep from having to specify the same rule sets over and over, CSS allows you to group selectors for use with a single rule set by joining them with commas. For example, if you wanted to style all six levels of headings with a particular font, instead of having to do this:
h1 { font-family: "My Snappy Font"; }
h2 { font-family: "My Snappy Font"; }
h3 { font-family: "My Snappy Font"; }
h4 { font-family: "My Snappy Font"; }
h5 { font-family: "My Snappy Font"; }
h6 { font-family: "My Snappy Font"; }
You may simply write it this way:
h1, h2, h3, h4, h5, h6 { font-family: "My Snappy Font"; }
One extremely common mistake when grouping selectors is to write something like this:
div#maincontent ul, ol
When what is really meant is this:
div#maincontent ul, div#maincontent ol
When grouping selectors it is very important to realize that the comma starts an entirely new selector from the beginning. That is, the first selector would select any unordered lists that are inside of a div with the ID “maincontent” and any ordered lists anywhere in the document. The second selector, on the other hand, would select any ordered or unordered lists that are inside of a div with the ID “maincontent”.
To visualize this, it helps to picture the comma as a newline — to
view each grouped selector on its own. Looking at the first selector
this way you’d see much more clearly how the ol is off by
itself:
div#maincontent ul
ol
Wrapping Up
By now, you should have a pretty good handle on the components for building selectors in CSS 2, and the theory behind them. You should be fairly comfortable breaking down existing selectors to understand their meaning, and building up your own layer at a time. To test your skills take another look at that selector I mentioned back at the beginning of the article and see if you can describe what it would select:
div#main > h3.product + p:first-line
If you get stuck, or if you just want to check yourself, try running it through the Opal Group’s SelectORacle. It’s a very useful tool that converts CSS selectors into almost plain-English descriptions of what they select.
Be looking for the second piece in this series that will tackle the cascade, explaining how rules are sorted and applied based on their origin and relative weight, or specificity. Also, if you’re interested in looking ahead to where selectors are going, you might want to check out the CSS 3 Selectors Module, which is currently a Candidate Recommendation. CSS 3 selectors change some things, but for the most part build on top of what you now know about CSS 2 selectors.